Monday, August 11, 2014

Playing School: Assessment Time

If your child has never done any schooling this may come as a complete shock to you: Children are brilliant.

She-she, around age 1.
Ask a child what color such and such is, and whether told previously or not, they'll likely be able to tell you, or describe it like "well it looks sorta like red, but is lighter".  They might recognize things like the star beside the elevator button, or at the very least, that parking under the Golden Arches likely means burgers are about to be had.  That's because young children learn by observation more than most anything else.

My husband will forever remember the day our beautiful little almost 1 year old sat up on his lap placed a finger on the tip of his nose and declared triumphantly, "Nose!"  It was her first word.

 So when you sit down with your little toddler to do these "I Can" pages and take the "Readiness exam", you may be completely shocked to realize your child might be able to do a lot more than you thought, thus allowing you to dive a little deeper than you had planned.

That's why I really recommend doing these with your children, and the more excited you are about it the more excited they will be.

The first thing I recommend is the I Can... Assessment, its pretty basic, but deep enough to allow your child the opportunity to show off - not to mention its free, cute, and not as intimidating as the dozens of pages I've found in other packets.  (You do have to sign up for a Teachers-Pay-Teachers account, but that too is free, and not intense.  I've pulled tons of packets from here and really do recommend it.)

http://www.teacherspayteachers.com/Product/I-Can-Simple-Daily-Assessments-for-the-First-Week-809903

The other is an online website called SchoolSparks that has a Kindergarten Readiness Test.  The most excellent part of this test is that it includes a variety of assessments from math skills to gross motor skills, and provides feedback on how you can help your child grow in the areas they're weakest.  (The chart below is not She-she's, I just clicked through it quick to show you the end graph.)


She-she and I sat down and did the I Can... series together to prep her for school this week, and when I loaded up the SchoolSparks sight I had her near to play with, she enjoyed hopping on one leg and showing me "she could do it" to so many of the questions.  Be excited, and they will be too!

Sunday, August 10, 2014

Bella-Boo's Water Obstacle Course

This is actually a project my sister and her man did for my niece's birthday, but its so clever and fantastic that I had to post it up for the world to see!

All that was used for it was PVC Pipe, waterproof glue, and a drill or hand saw.

To quote my sister, "You take the PVC pipe.  With some glue.  Make a cut here and there and TADA!!! Obstacle course! Lol."

I'm thinking next summer this is on my to do list!

Bella-Boo and Z runnin' through the obstacle course!

Tuesday, August 5, 2014

Playing School - Our Daily Start

One of the things our Kindergarten asks for our children to learn is the calendar.  They should know the days of the week, the months of the year, and have a general knowledge of the clock.  Since my daughter could maybe tell you that Friday was a day, but couldn't tell you when day it was, I figured we needed to really dive into the calendar, thus our Daily Start with Calendar Time!

Let me first explain our "Calendar" and link you to some great places where you can make your own.  In total I spent about $30 in this because I really wanted a laminating system to get all the individual little parts.

Break Down:
$0.69 for the wildly pink poster board. (My daughter's choice)
$27.99 for the laminating system.
About $0.50 worth of white paper...if that.


We have our actual calendar, which I got from TpT.  This will be our daily start to bring us into focus for school.  We'll start by singing the Months of The Year to the tune of Ten Little.  Then we'll put up the day of the month it is, count to that number, and sing our Days of the Week to the tune of The Adams Family.


Then we'll move over to our clock.  I really wanted one that included the :00, :05, etc. so I opted for one similar to this one.  We'll discuss what time it is, and AM and PM, when lunchtime is etc.

Then we will go to our weather chart and weather bear.  I created my own weather bear, which is really simple to do, but there are dozens of links out there for both the chart and the bear.  I'll be scanning it in soon so everyone can have access to it - I just can't get to it today.  (Oh the joys of pregnancy! haha)


Once we have completed the calendar we'll do our "Wow's" (___ of the Week).  It will include color, number, shape, letter, food, and animal.  

I think our daily start will be a great way for She-she to focus in on school and be prepared to start the day.  

Monday, August 4, 2014

Playing School - Preschool Style, 6 things to Get Ready for Homeschool

My She-she is five years old this October, missing the cut-off for Kindergarten by only a few days.  I could have tested her to see if we could force her into Kindergarten, but we have big changes, a new baby and possible move.  I knew I wanted her learning and growing, but I didn't want to put her in a preschool only to have it change within a few weeks or months.

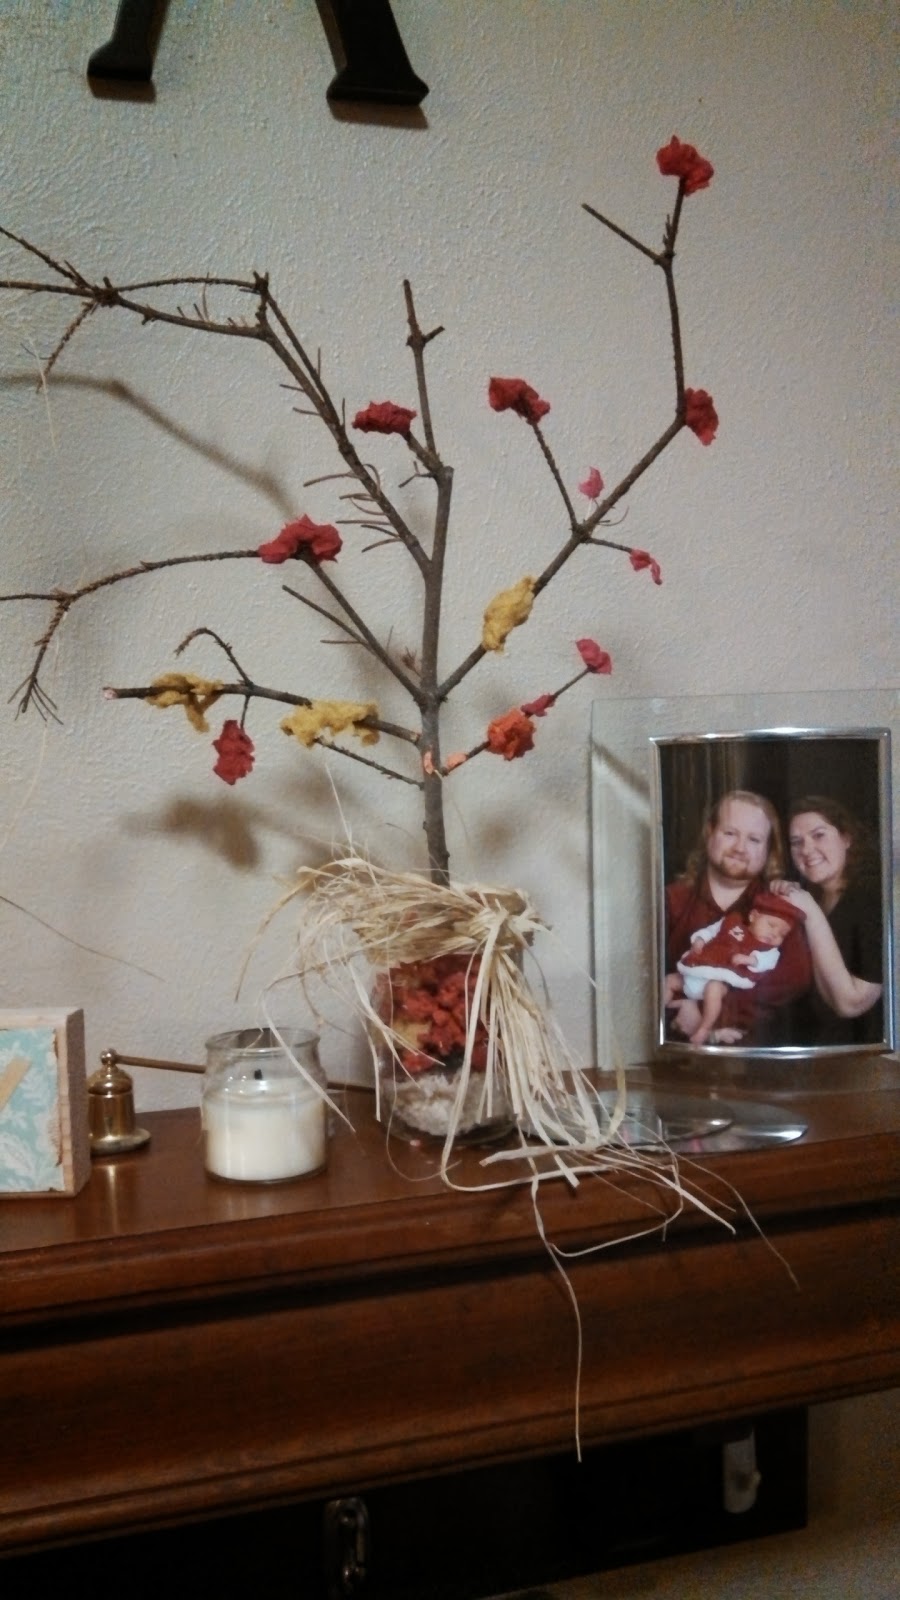
Last year I "home-schooled" her, which is to say that I got several cute books, printed out a few hundred alphabet printouts and did a few projects I found on Pinterest, like this Tree. 

She-she wanted more.  She craved it.  Begged for it.  Constantly asked if we were going to do preschool projects again.  

So this year, despite a brand new baby coming in Sept. I am planning out an in depth, very detailed, 5-10+ things to do a day away from computer time, TV, and general play.  I really am going to "Play School" with my daughter!  

For the past few weeks I have delved into the realm of Pinterest, TpT, and countless blogs reading about teaching as much as I can.  The good news is I have a bit of experience, I was a substitute teacher with the Meridian School District, a toddler teacher in a day care, and nursery provider through church.  More good news is there are thousands of resources.  So what's the bad news?  There are SO MANY resources!  I am spending hours at my computer (which being on bed-rest these last few weeks has been a good way to pass the time) trying to find the best way to teach, play, and have us look forward to school each and every day.

So in my final week of "prep" for the start of this school year I figured I'd share with you guys how I'm going about doing it so if you have a young child (3-5 year olds) and want to get them involved and ready for school you won't have to spend the 200+ hours I'm currently rolling into this.  You can, of course, adapt this to you however you would like, I hope you enjoy the research I've done!  

~~~~~~

First, print off a calendar/day planner for yourself, I found this one (2015) and this one (2014) from HandmadeHome.net to fit my needs spectacularly.  I will say that the monthly calendars, the weekly calendars, and the reading chart were the only ones I needed for school.  I am scheduling Sept - May and 41 weeks, I printed off 9 reading charts with the goal of 20 books a month to be read to She-she, not counting her own library books, and the chapter book we read at night as a family.

Second, decide what your goals are.  Last year Ashleigh pretty much mastered 90% of the alphabet, she's still a little iffy with her W's and V's.  So I'm hoping to get her involved with some sight words, and bump up her numbers (she's only adding 1s and 2s, easily) and increase her color play.  I also discovered my school district likes to have kindergartners know the days of the week and months of the year, she has no clue on those, so we'll be practicing those daily. 

Third, outline your week/year.  I'm a full-time stay at home mom, but I know that Monday's and Wednesdays my husband will be out playing soft ball in the evenings, and we'll likely want to go so I don't want to do a lot of running and physical play those days (remember I'll be recovering from birth and have a new baby!).  I know her dad also has Friday's off from work, so field trips on Fridays would be ideal because then he could come along.  If you know you're flying to Disneyland the first few weeks of Dec. don't plan school!

Fourth, and this is the part that gets hugely personal, start planning what you'll teach.  I know we're going to do generally do a series of "Wow's." (that's what I'm calling them.) They will include a Word, Color, Number, Letter, Animal, and Food.  That will consist of roughly 30 of my 41 weeks, 26 letters of the alphabet, with 4 as review weeks (particularly for numbers and letters).  The other 11 will be holiday weeks, we're Christian so we celebrate Christmas and most "standards" like Halloween, Thanksgiving, Valentine's Day, etc.  I will also be including a unit on the four seasons, the body, what I want to be when I grow up, the five senses, and maybe a few others depending on my mood.  

Fifth, set up a shopping / check list to get basics.  There is nothing worse than deciding to do a major project with your child and mixing everything together only do discover you ran out of corn starch!  And put them all in a big box together. Here's my list:  (Most can be picked up from the Dollar Store or you'll already have laying around your house.)

Felt / Fabric Scraps
White Liquid Glue (2 bottles +)
Beans or Beads (For counting, gluing, etc.) 
Liquid Starch (For Goo) 
Glitter
Ink Pads
Paints
Shaving Cream
Sticky Stick (That stuff that's like gum to stick paper to your walls)
Googly Eyes
Pipe Cleaners
Paper Plates
Clear Cups
Stickers
Balloons
"Holed" Cereal (Cheerios, Fruit Loops etc.) 
Buttons
Yarn / Thread
Corn Starch
Baking Soda
Vinegar
Crayons
Markers
Construction Paper
Glue Sticks
Safety Scissors
Salt

This list, minus the food I want (for snack time and play with your food time) is pretty much what I plan on using all year, most all crafts I've found can be satisfied with these things.

Sixth, set up a Pinterest board for preschool.  This is the greatest thing you can do for your planning, there's so many great ideas.  

Monday, December 2, 2013

Texture Play

Babies, toddlers, and children all around need to be comfortable with experimenting and texture play is one of the best ways for them to grow accustomed to different things.  There are a lot of different textures children can play with, fuzzies-like teddy bear furs or cotton balls, slimes like Goblin Goo and Shaving Cream Paints, and doughs of all sorts - edibles, snows, sands.  Not to mention dozens, if not hundreds of toys and books.

Don't forget when playing with your kiddos as they work with the different textures to help them learn descriptive words, if they're very young, like rough, slick, soft, hard, hairy, fluffy, or if they're older help inspire them to think, like what happens when we stretch it?  What happens when we squeeze it?  What happens when we roll it?  Does it hold its shape when you let go?

Involve your young one with things you do in your daily life that have different textures, like baking, cleaning with sponges and water, involve her in the art projects, the fun and the work.  Talk about the difference between pastas, and the texture of the carpet versus the tile.  Let your babies ask questions.

She-she and I played with Oobleck, (Corn Starch and Water) she's young enough that we didn't discuss polymers, or the actual physics behind it, but we did discuss that sometimes things are liquid and some are solid.  We came up with a few other things that are in solid and liquid states that she's familiar with, water and ice, cake and batter, ice cream and milk.

Remember though, that any sort of learning through play is about the play first to your child, don't make learning un-fun!

Yummy Fruit "Cake"

So my dear She-she turned four in October (thus the painting of a jack-o-lantern on her cheek) her birthday party was on the Saturday after her birthday, but her grammy wasn't able to be there on the day of the party so we wanted to throw a bit of a party on her actual birth day.  We are striving really hard to reduce processed sugar in our diets, striving to make changes with the level of red meat, the level of unhealthy foods, and we already had cupcakes planned for the party, but honestly Grammy was a life-saver in the cake department.

I was concerned; how can you ever say, "no birthday cake" to a young child?  So when Grammy suggested a fruit "cake" we gently asked She-she if she'd be ok with it.  I was floored when she got excited.  Part of it I'm sure was our excitement (even if a bit mocked on my side) and promises that it would be special.  So then we hit Pinterest, hunting for kid's style fruit cakes... I was...less than impressed.  Again Grammy came to the rescue and brought up the idea of a ball gowned princess fruit cake.  Frankly it ended up being adorable.

Watermelon, grapes cut in half, blueberries, strawberries in half, oranges, peaches, and a bit of cream cheese and marshmallow fluff fruit topping, all of it was designed to bring joy to my baby girl and joy it did, with not near so much undesirable calories.

Tuesday, November 19, 2013

Fall Days - Preschool Tree Time!

One of my all time favorite times of the year is the transition from fall to winter, the leaves changing color, the chill in the air, the holidays looming and coming and looming and coming, the children's crafts, the excitement, the giggles.... I could go on forever.  

Yesterday I wrote a post about taking advantage of every learning opportunity you get, but I should also admit that I do have a formal "preschool" time with my daughter, we attempt one to three times a week, sometimes we'll get in all five days and sometimes we'll skip a week entirely.  It's flexible because she is young, and because we're busy!  But I do have an entire binder that I have started to accumulate awesome homeschooling things within, things like free printables (http://www.allkidsnetwork.com/worksheets/) and crafts like the one we did yesterday which I also got from an amazing blog called Housing a Forest and a rough week-by-week schedule.

Anyways! On to the fun!  While these trees look awesome, and took a while, they were incredibly easy and the kids (ages 2 1/2 and 4) had a ton of fun every step of the way.  

The first thing I did was to shred up about 3 pages of each color of construction paper and put them in about 1 to 1.5 c. water.  This will start the paper pulp, but they need to have a good while to really absorb the water.  As we were doing a fall theme we chose red, orange, and yellow (like the example.) we loved it so much though we might do it in the spring time and do it with green and pink and make apricot tree blossoms.  

While the paper was soaking, we made the "Salt dough hills."  Salt dough is the easiest thing to make, 1 c. salt, 1 c. water, 2 c. flour.  If its a little too wet or dry add more flour or water.  Now I didn't know how well these would hold up, and I wanted ours to go on the mantle, so I used wide mouthed pint sized jars and we shaped the dough to fit into it.  (I will say when you bake there's a slight bit of relaxing, so make it a little smaller than the cup's diameter.  I ended up having to rip off some of the edges of their hills to cram them inside.)  The dough once baked however did appear to be strong enough to hold up the single branch trees,  I had also thought about putting them in little tins from the dollar store, but liked the mason jar look.  You can use whatever you want for the base. 

The kids helped with every step of this process from pouring flour to mixing to rolling and playing.  When they had the basic shape of their "hills" we stuck in our branch (just pulled from my own back yard.) to give it the general fit for the branches.  Then I stuck them in a 250 degree for about 30-45 minutes.  I wanted them to be dry enough to paint, but still moist enough to force the tree into.
While the dough was in the oven we worked on our ground covering - what else but a pile of leaves?  We took the colors and put them in the blender, (lightest first) and blended up the paper.  I found that I needed to add extra water to make a good pulp of each of the colors.

Once the pulp was finished I let the kids each have a color and we started pinching out paper.  I covered a plate with paper towel (to help with the mess and to absorb the extra water) and we each started pinching the leaves out.  For individual lives simply squish the water out and set them on the towel.  My daughter did this for a bit, before deciding she didn't like the individuals much and decided to roll it into a big ball and crumble it and squish it, honestly, it looked just as awesome and resembled more a raked pile that the kids had played in then the perfect ones.   

Baby B (though not much of a baby any more!) was much more precise and preferred to only take a few fingers to squish the leaves individually.  Both of them ended up getting some beautiful leaves and a good pile by the end because neither wanted to just leave the paper to dry, both wanted to play with the pulp a bit, and as it was their day I wanted them to do what they wanted to do.  
When they were done with the leaves I pulled the dough out and let it cool while we did lunch.  Once cooled the kiddos enjoyed painting their hills "natural" hill colors, browns and greens.  This also allowed the leaves the opportunity to dry while they painted.  When they were done with the painting we did some fun time away from crafts to let them dry.  When I could handle it I put them into the pint jars and pushed the tree into the dough.  I thought I would need to hot glue this, but it was a nice snug fit, I can only assume from the expansion while it cooked.  
Once the trees were in their jars it was time to start putting the leaves on the tree itself.  The fun with this was how random and easy it could be, you could put as much or as little on as you want, it looked good with the branches in bare and the ground leaves we'd done earlier in the jar.  I had to help B a bit to get the leaves to stick in the beginning, but by the end he was figuring it out and wrapping it well.  The thing I would recommend is that the older party help squeeze some of the water out to ensure the paper will stay on the branch.  If they got too big of a wet clump it would all fall right off. Also I have to agree with the Housing a Forest author - the more erratic the better.   

She-she's Tree.
Baby B's Tree
Once that was done we tied a bit of raffia around the pint jars and I set them on the mantle to dry. If you don't have / don't like raffia, fabric, burlap, ribbon, yarn.... pretty much anything to accent it would work.

It's Gorgeous!!! It's totally a craft that I want to display in my home. :)  It may even be a yearly tradition and at $0 a tree it would be one we can always do no matter what finances look like.  :)  For sure my favorite craft of the year thus far.