Wednesday, July 17, 2013

Diva Dolly Apron

 This actually was my niece's Christmas present, I made a "set" for my sister (Banana) and her daughter (BellaBoo), but it turned out so cute I thought I'd share it with you.
I'm sure you have seen the "flirty" aprons around the web, maybe even contemplated spending the $30-50 on them, but they are really incredibly simple to make, and even a novice seamstress can come away with something adorable.  (You will have to beg the pardon of my grumpy daughter in the photos - she just found out we weren't keeping the apron she was trying on.)  

First, choose a fabric that is washable! No silks, brocades, or satin's here, you want this to be adorable and FUNCTIONAL.  I chose polka-dot and zebra print because it really fits my sister and her daughter, but choose whatever you like.  I think (its been since November sorry!) I got two yards of the polka dot for both of them and a half yard of the zebra print - as I couldn't find any ribbon I liked, so I made my own.  
Next, get a rough estimate on the size of their chest.  Remember as an apron you'll want it to be snug enough to not get in the way, but big enough to cover most of their shirt.  I measured my own and subtracted a few inches since my sister's smaller than me!  I measured She-she and added a few since her cousin is older than her. Make sure to leave an extra half inch for sewing up the edges!

Third, use a piece of paper or a scrap of left over material or newsprint, and, folding it in half, draw a half a heart.  Draw a line down from the outer edge at a softer angle. Wall-ah you have your bodice.  If a heart doesn't fit your mood you can do a square, a circle, or whatever your heart (haha) does desire.  Once cut simply sew around the edges.  Clip any corners to keep it from puckering.  Set aside.

Fourth cut a large square (I measured to about my knees and took off about 3 inches for my sister.) I have seen many different styles of "skirts" before, everything from upside down hearts, to multiple layers, have fun and get creative with it.  I simply did a square then folded it in half and rounded it out.

The "gathering" is probably the most difficult part of this and really isn't difficult.  Using your sewing machine on the widest stitch possible do a quick straight stitch across the top - DO NOT knot it on the ends.  Find your center point and grabbing one thread gently pull it, supporting the cloth as it gathers.  You want these to be relatively similar, I found it best to "guide it" with my fingers, pinching where I wanted the pleat, and pulling where I wanted it smoother.  Compare the size to the bodice to ensure you're not gathering it too tightly.  When you have it the way you want it "lock it in" by sewing over it with a tighter stitch.  Again check the "fit" and then sew the top and the skirt together.  

Then you will want to add your ribbon for the waist.  Since I made my own ribbon I doubled it over and stitched it together then flipped it and hand stitched (like making a long skinny pillow without the stuffing.) If you have ribbon you can sew it on however you like, I've seen it behind, I've seen it in front, I've seen it attached to both sides, I've seen it long enough that you tie the bow in the front.  I chose a back button because I wanted it functional, and didn't want froo-froo in the way of the cookies and cakes!  Then using the same ribbon sew on the top.  Embellish with anything you want - I did an iron on patch that said "Diva in training."
Any decorations you do will be adorable, and it made BellaBoo and Boo happy. :)  

Tuesday, June 18, 2013

Sweetheart Chair

 For She-she's "Sweetheart" bedroom I decided to make a Sweetheart Chair. These chairs are easily adjustable to fit whatever theme you want to have for your little dollhouse room.  It can be expanded into couches and personalized in general.


1.  For this one you will need a piece of wood (Mine is just under 6 inches) and whatever "decor" pieces you would like - In my case I opted for 2 hearts.

2.  Cut the wood at a 30 degree angle.  For straight up and down do a flat cut - This offers a slight recline that appears more comfortable.

I chose to round out my seat "cushions" for a softer look.  I did this with a power sander.  


 3. Sand all the edges, including the back.  


 4. Test the fit and angle.  If it isn't flush adjust a bit with the sander.  


5. Using a file rough up one side (the side you intend to glue) this helps it adhere fully.
6. Liberally apply the glue to both sides and stick together.   

7. Let it dry fully. 
 8. Sand down any excess glue once fully dry.
 9.  Rough up your decor pieces.
10. And glue them on.


10.  Let dry and paint however you would like. I went simple so I could accent it with pillows.


Monday, June 10, 2013

Fleece Blankey

Diffuclty Rating: 1.5 - Child's Play 
(Scissors should be used with adult supervision.)

She-she's bedroom started out as a "baby bug" room, particularly the "pretty" bugs like lady bugs, dragonflies, and butterflies, but as she's gotten older she's wanted more and more Tinkerbell.  We have a slightly "odd" bed for her - its dimensions are not quite toddler and not quite child, so i decided to make her a fleece tied blanket all to herself.


I took my sweet little girl to JoAnn's with me and we chose two fleece's - one of course with Tinkerbell, and one with the background.  I particularly wanted the little "bumpy" fleece as it was extra soft and cute, She-she chose the color.  
Now you've probably seen this before, as its incredibly easy and they were hugely popular some eight to ten years ago. but for a quick reminder this is how you do it:

Step 1: Choose two of roughly the same weight fleece fabrics. place them together right sides out.  There is no flipping reverse sides like regular sewing.

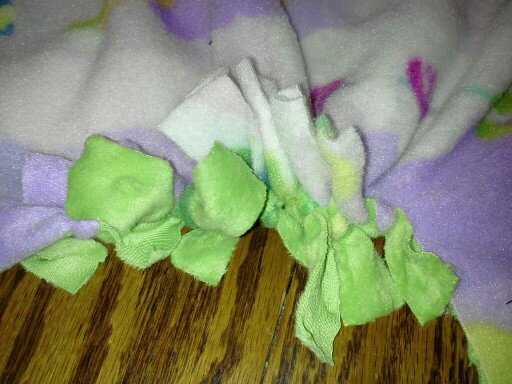
Step 2: Going in about 3 inches cut 3 inch long strips about an inch apart. I did the first few with rulers, and had the ruler sitting there to check when I felt they were getting a bit off.


Step 3: Using the front and the back strips (in my case Tinkerbell and the green bubble fleece) tie a simple square knot.  I highly, let me repeat that, HIGHLY recommend knotting every few strips.  A strong wind, playing kids, running cat or anything else could move your fabric so the front and back cuts are off and your ties will be all messed up. 
 Step 4: Repeat until you come to about 3 inches out of the corner, tie it snugly and don't worry about bunching you'll stretch it a bit later. When you reach the corner, simply cut the rest of the fabric off. (See photo.) Then continue going along the other side with the same knotting method you used, repeating the corner cutting until you are to your very first corner.


Step 5: You will likely notice that your fabric is incredibly bunched, this is normal and shouldn't concern you.  Simply grab it along one edge about 6 inches apart and pull it to stretch it back out to its regular grain.  You may hear a little tearing here, but that's normal.  Watch what you're doing however as it is possible to rip a knot right off, but its difficult. 


Step 6: Fluff the edges and tighten any that have gotten lose, once tightened they will do well for several years. 

In fact, I have a quilt my mother made me using this method when I was still in high school (I wont say how many years ago that was haha!), other than having to tie a few knots over the years its been fantastic, none of the edges have torn off and while some stress has been made to it, its still in very good shape.


So if you're looking for a sweet gift idea or a fun thing to do on a slow Sunday why not opt for a quick fleece quilt?

Days With My Own Dolly

The rush for getting the dollhouse ready by Christmas morning prevented some of these blogs from hitting the net, in fact many of my pictures are so scattered through my albums that I'm not sure if I'll ever find them.  But I did want to let my readers know that I did make the only true and important deadline and the dollhouse was ready and adorable for my daughter Christmas morning.  I was very pleased with my little She-she's reaction to the gift, and am sharing it with you in the embedded photo.

She is a pretty spectacular little girl and an amazing light in her father and my eye.  Six months later and She-she has customized her house several times over (she took chalk to it) my initial reaction was a panic then I realized this is best, she and I will be able to remodel and add on to it plenty in the years to come.


And just so you don't fret - I am going to be uploading more dollightful "Barbie-sized" crafts and I'll be including more things my dolly and I do together, everything from preschool to mudpies. :) Enjoy!

Wednesday, November 7, 2012

Working With Mistakes

My... pillowcase?
When you work with crafts you quickly realize that even the most experienced person makes mistakes, and if you're like me, you aren't the most experienced person.

Most of what I'm doing on this dollhouse is new stuff to me, taking crafts that I've played with before (like crocheting) and adjusting them to work with a dollhouse.  The only things I've crocheted before are lap quilts in a simple straight lined weave.  I decided this time I would attempt a circular weave for the pillow cases.  Lets just say it didn't work - but out came a pretty cute looking hat small enough for Barbie.

So when a cut goes wrong, the paint spills, or something seems to horribly go awry take a step back and try to see it as something else.  What could this be used for?  Could you adjust a few things and have it work out in a different way?  Being flexible is one of the most important things when working on crafts.
  

Monday, November 5, 2012

Sweetheart Table

RATED: 2 for Difficulty 

This piece was perhaps the easiest I have done so far, but it also took many small steps and time.  In the end I think its pretty adorable, but I'm concerned it is a bit fragile and the second its stepped on or given too much pressure it will break - so I'd recommend it for an older child's dollhouse.

Carve the top center of the heart (or your shape).
What You Will Need:
3 Wooden Cut Outs
 ~2 for the "legs" (Same size)
 ~1 for the table top
Wood Glue
A straight edged knife
A "V" edged knife (Optional)
Sand Paper
Paint

Carve the bottom center of the heart (or your shape).
The hearts were $0.25 each at JoAnn Fabrics - most craft stores have simple cut outs of crafting wood for really cheap.  Since I had the items I needed from other projects from the dollhouse this means that I added $0.75 to the price of my dollhouse.  Not bad for a cute item to finish my desires for this little room.

The wood I chose is very slim, maybe 1/4 inch thick.  

Start by carving a slim straight line in the top of one heart and on the base of the other.

These take a bit of time because if you make the cuts too wide they will fall apart.


Widen it with the "V" Tool.
That said you can use some wood glue if you want to add a bit of extra security or if they don't fit perfectly together.

I forced mine once I got most of it done and it worked pretty well, it was a tight squeeze but its nice and sturdy now.

I found my "V" tool was best to use to take out the material quickly once I etched it with my line blade.  It was also nice to take away some rough edges once I had the piece near the right thickness of the wood.

Get the fit snug and make sure it stands nice and flat. 


Next test the fit,  I slid them together several times to find the snug fit, its important to make sure the legs are level or the table will wobble.  When you get close simply sand down a bit and wedge the pieces together.  I found I could apply quite a bit of pressure to these little pieces and in the end they fit pretty snugly.

Sand it smooth, and glue it together as much as you want.


Next paint.  I have already created the patchwork quilt, and knew I wanted the room to be in the soft blues and mauve-pinks, so choosing the color was pretty simple.  Since my paints didn't match perfectly I ended up mixing.

If you have never mixed your own paint it can be quite a challenge, and making sure you make enough so you don't have to start over can be just as frustrating.  We all know the basics, red and blue make purple, blue and yellow make green, yellow and red make orange.  But adding bits of white, gray, black, or even brown can add warmth or a tint you didn't know was possible.

My mauve color inspiration. 
When I start mixing my acrylics I settle down for the "Long haul" unless you have some way of keeping them moist with retardants, humidity, or wet paint boxes your paints will dry out if you haven't got your projects ready to paint before hand.

Which means have your wood sanded and prepped, clean it with a damp paper-towel and make sure its nice and dry.

Then if I have a specific color in mind (In this case matching it to the mauve color on the quilt.) I would look and decide what colors probably made it up.  In this case I knew there was a red closer to the purple scale than the orange.  I also knew the gray around it complimented it, so I guessed it was mixed a very light gray blue gray instead of pure white.

Pretty fair match on color I think. 
So I took my colors and using a paper plate simply squirted three separate piles of paint around the edges of it.  Why didn't I just pool it all together in the central part of the plate you ask?  I had no clue how much of what color I needed, and putting separate piles allow for you to mix and match without reopening the tubes or having to scrap it entirely and start over.  Then I took a plastic knife (If you have a paint blade awesome, but a plastic knife works.) and I took a big chunk of my red and some of my gray and white and started in the mix.

Adding small portions I built up until I was pretty close to the color I wanted.  I made sure to use a bit more than I thought I would need to use because I wasn't priming my table and it would soak up more of the paint then if I was or if I was painting on a prepped canvas.  Also with acrylics when they dry they tend to dry lighter than when wet, so keep that in mind when mixing.

File the tip down to be flat to hold the table top.
The other fun with acrylics is you can use them as a paint, as a wash (or glaze), or as a water-color simply by adding more water.  Since the wood on these wasn't particularly "grained" I chose to use it as a paint and while I was careful to do it smoothly with enough water that it wasn't really bubbled anywhere, it looks thick like a paint instead of as a wash.  (More on that in the bed-making tutorial.)

You want to make sure its fully dry before you work with it again or you will get fingerprints on it.  I usually wait over night.

Once dry flatten the top by filing (I used a rip-file my husband informed me) to take the tip of the hearts off making it flat enough for the table top to fit on top of.  (See the photo above.)  If you look closely at the top you will see where my wood flaked a bit due to the rugged file.  If you paint after this you can prevent that, but it was barely noticeable when creating and once glued its completely not.  But I'm telling you what I learned (haha). 

Glue the top to the base.  Clamp it - or it will most likely dry crooked - mine partially did and I had to add more and adjust it.

Once finished you can embellish it however you'd like.  I am still debating on adding a few hearts to the legs.

In the end this is my little table, about three inches tall with a nice flat table top that can hold teddies or lamps or clocks or whatever knickknacks you want to finish your room with.

The finished piece. 

***You could easily adjust this piece by buying wooden flowers, stars, trees, circles, squares etc to better fit the decor of your dollhouse's room.***

Friday, November 2, 2012

The Patchwork Quilt

RATED: 3 for Difficulty


Ok - I apologize for the seriously long away.  We had a very exciting month of Oct. and it prevented me from much work on the dollhouse, let alone writing about it.  But we are finally back to it (with only 7 full weeks left until Christmas, ahhhhh!) So you can expect a lot of stuff coming out here in the next two months. :)  (I also apologize for the lack of photos on this particular blog - I created the quilt and pillows before I decided to do the Dollighted! blog.)

One of the very first pieces I did was a patchwork quilt.  Now I will be the first one to admit I am not a quilter.  I don't know how the "experts" do it or what the official method is, but the one I used worked pretty good I thought, and turned out well.

I started by cutting 1 inch by 1 inch squares. The more accurate you are in your squares the easier this will go, so take your time.  I used a piece of the stiff fabric to make a pattern and simply cut them out.

Then I arranged my pattern.  My grid is 4x6, with a one inch border, but I recommend if you're using 1 inch squares to do at least a 5x7 with a 1 inch border for adult Barbies.  This one is intended for the "sweetheart kids" room and only hits Barbie at the bust.

Once I had them laid out I stitched them together into columns, one square at a time with my sewing machine.  I started in the upper left hand corner and sewed the square right below it on, then the square right below that.  When I had 1 column done I did the second column, then the third, and fourth.  I stitched them all together after, going slow and steady.  When I was finished with that measured out 2 columns (for the sides) and 2 rows (for the top and bottom.  I stitched them directly to the squares, and then stitched diagonally to each corner.  I sewed on a back being sure to flip it inside out and then stuffed it and hand sewed it shut.  It is "tied" with embroidery floss to keep the stuffing in place.


The heart-shaped pillows I sewed front faces out so that I could have the little "fringe" edges. The rectangle I simply reversed and hand stitched on one side.  The cylinder was a rectangle of fabric rolled up with two circles hand stitched on the ends.  It took me about two hours from start to finish for the whole bedspread, and looks like I spent days.